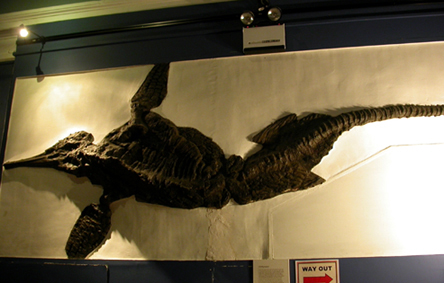
 The specimen:
This large ichthyosaur skeleton is approximately 4.6 metres long and is relatively complete. The only significant
pieces missing are the rear limbs. It was delivered in eight Plastazote-lined plastic crates wrapped in acid-free
tissue paper, and was in 72 large pieces and dozens of smaller fragments. It had previously been wall-mounted
and most pieces of the specimen still had plaster and mortar etc attached to their sides and rear.
Several of the smaller paddle bones and some small tail vertebrae were missing. For an account of removing this
specimen from the wall in the Hancock Museum see
this page.
The specimen:
This large ichthyosaur skeleton is approximately 4.6 metres long and is relatively complete. The only significant
pieces missing are the rear limbs. It was delivered in eight Plastazote-lined plastic crates wrapped in acid-free
tissue paper, and was in 72 large pieces and dozens of smaller fragments. It had previously been wall-mounted
and most pieces of the specimen still had plaster and mortar etc attached to their sides and rear.
Several of the smaller paddle bones and some small tail vertebrae were missing. For an account of removing this
specimen from the wall in the Hancock Museum see
this page.
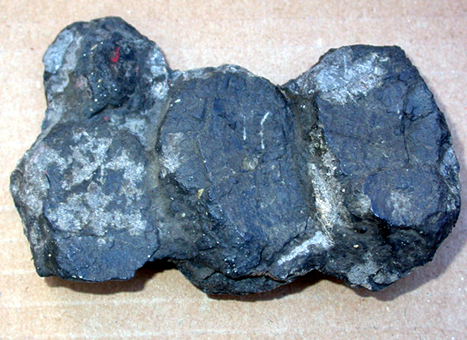
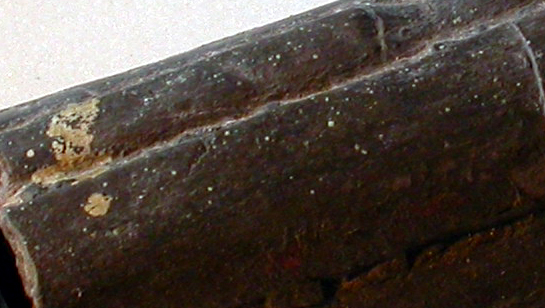 The specimen was dusty, dirty, covered in an old varnish and had tiny paint splatters of several colours over every square inch of its surface from when it had not been covered whilst decorating work had been undertaken nearby in the past ( The image on the right shows a fragment of the rostrum/snout showing paint splatters ). The specimen needed thorough cleaning and the old and deteriorated fillers and mortars needed removing. The specimen also required some preparation to reveal a better surface detail where possible. In addition, it also required remounting in a manner that enabled it to be delivered and placed straight into an appropriately-shape recess in a plinth for horizontal display.
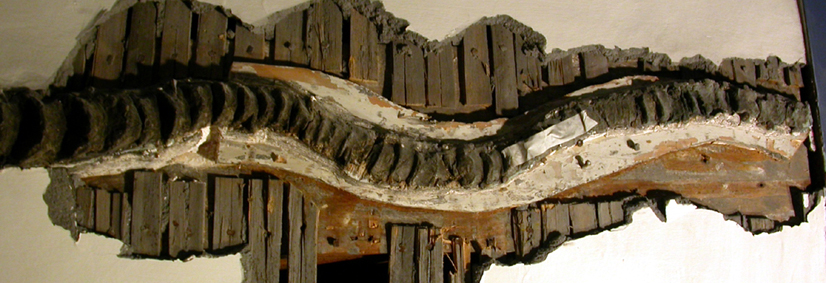
Cleaning and preparation:
The various parts of the specimen were still embedded in a variety of old plasters and mortars (some, such as the material enclosing the paddles, resembling a bitumous tarmac) that had been used to attach it to its wooden frame and slatted background on the gallery wall in a vertical position. These gap fillers and ‘surround’ were removed by small chisels and engraving pens and any resulting residues removed with an airbrasive machine utilising sodium bicarbonate and compressed air, then citric acid in distilled water at 5%. This provided clean surfaces on the rear sides of the bones or the rock in which they were embedded, as well as some of the top surfaces. All old breaks were cleaned in the manner described above. All this took many weeks of work.
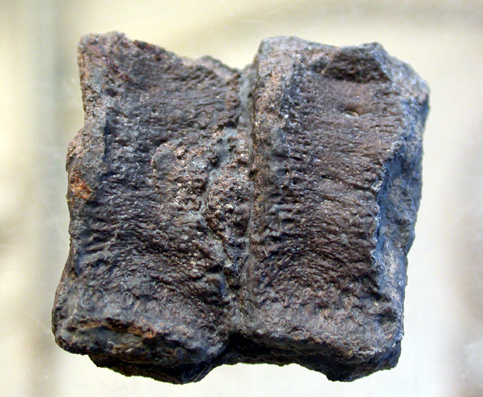
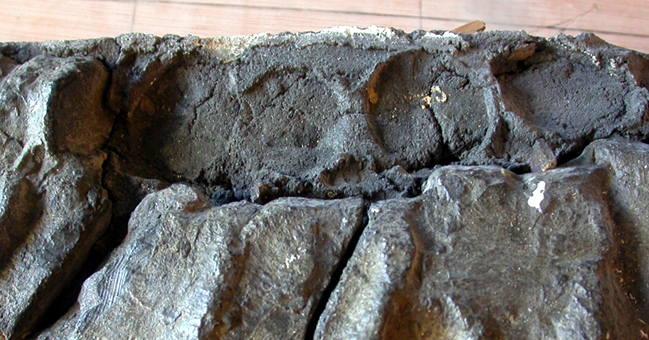
The bulk of the work undertaken in terms of time was the careful airbrading of all surfaces of the specimen with sodium bicarbonate. This was to clean all the surfaces to remove traces of paints, glues and plaster/mortar etc and also to remove the matrix where possible to reveal the bone surface underneath. This was particularly productive when applied to the vertebrae and the phalanges of the forelimbs, where much more detail is now visible as a result (see photos below). Any matrix removed was saved, and a small box containing fragments of matrix was given to the curator when the specimen was installed. These could be useful in the future to help establish the exact provenance of the specimen.
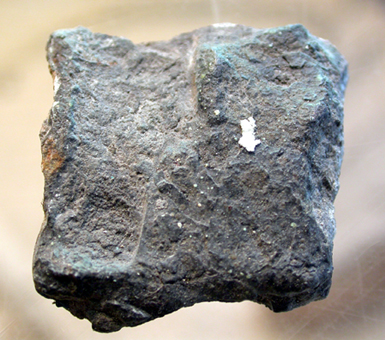
A pair of small fused tail vertebrae, before (left) and after (right) cleaning and airbrasive preparation.

Four fused phalanges before (left) and after (right) preparation.
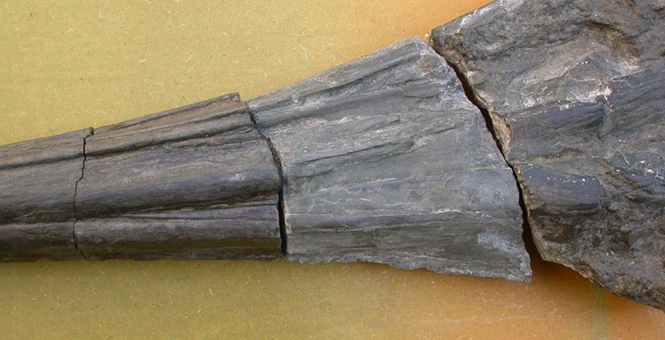
Portion of the snout, with the fragments on the left cleaned and airbraded.
The surfaces of breaks were consolidated and reversible adhesive was applied to the
surfaces of the breaks and the pieces placed together. Gaps were filled with a mixture made from Paraloid consolidant (30% in acetone) and glass beads 44 microns in diameter, and is reversible with the application of acetone (see Larkin & Makridou, 1999).
The various pieces of the skeleton were adhered back together to make seven main portions. These were left unattached until the specimen was finally put into place in the gallery. This was to ensure that they were not so heavy that they would pose a risk to workers in terms of health and safety, or to itself: repaired specimens can collapse under their own weight, and are prone to being mis-handled if too heavy. Gaps between the seven elements of the skeleton were filled with plaster containing appropriate pigments (so that any subsequent scratches or other damage would not show up so easily). The bone/matrix on one side of each of these gaps first had Vaseline applied so that the plaster did not stick. Therefore the two pieces could be separated from one another easily, before transportation to the refurbished gallery. All the gap fillers (Paraloid or plaster) were painted-out with artists acrylics.
Once fully cleaned and prepared, the surfaces of the bones and matrix were also treated with an application or two of Paraloid consolidant (5%) to protect the surfaces and enhance the natural colours, and to act as a barrier layer where resin was to be applied in the mounting process.
Modelling work
Several bones were clearly missing from the two front paddles, probably due to theft. Therefore, appropriate similar bones that lay adjacent were moulded in silicone wacker rubber and cast in Jesmonite acrylic resin, coloured with acrylic paints.
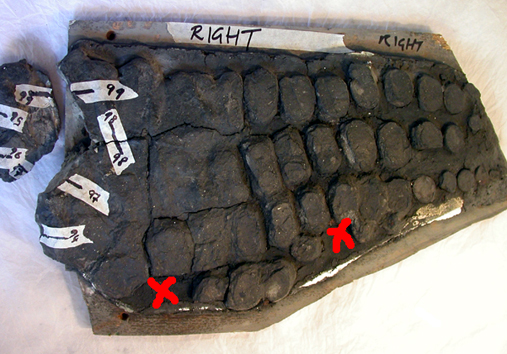

Left: The right paddle with red crosses showing empty spaces where casts were added. Middle and right:
The left paddle, set in original cracked and deteriorated bitumous resin. Four bones at the top of
the picture are clearly missing (enlarged in far image on the right). These were replaced with casts.
The paddles required a specific treatment not used elsewhere on the specimen. The numerous phalanges were
not embedded in natural matrix but in a coarse, unsightly, non-archival and deteriorating bitumous resin which
needed removing (see above). However, the exact positions of the phalanges relative to one another
needed to be maintained, therefore silicone-wacker rubber was applied after consolidation of the bones. Jesmonite resin was used to make a rigid support for this temporary mould and the whole paddle turned upside down. The bitumous backing to the paddle and the broken soft wood was removed by various means including engraving pens and airbrasive. This left the bones upside-down but sitting in the rubber in their exact positions. They could then be removed one at a time and prepared by airbrasive and replaced back in their correct position.
Once the preparation work was complete, the specimens were treated with Paraloid consolidant in acetone (5%) and Jesmonite resin was applied to fill the mould, along with glass fibre cloth, in which the bones are now permanently set .It should be noted that before the rubber was applied to make the mould to enable this work, the casts of the missing bones were inserted and plasteciene was used to make up the final desired shape of the paddle. This was removed before preparation began. The moulds of both these paddles are available if required – casts could be made of the paddles from these moulds for handling or educational work.
The last dozen or so (very small) vertebrae at the end of the tail are embedded in Jesmonite resin. Some vertebrae were missing and gaps have been left where this was the case. When previously on display, the distal end of tail was arranged to be horizontal but with a small kink rather than its natural downwards curve. This required re-arranging to be more anatomically correct. Research was undertaken to judge the right amount of curve to give the tail, and it was shaped and mounted appropriately. Many nails had to be removed from the tail section, and some of the vertebrae turned out to be lumps of plaster or mortar.
Tail before dismounting.
Mounting:
Sheets of archival Plastazote foam were adhered tightly to the undersides of each of the seven blocks of the skeleton with Paraloid B72
(after the surfaces had been consolidated to ensure good adhesion). Jesmointe acrylic resin with fibreglass
cloth was then applied thickly to form a robust contoured supportive jacket. This resin was applied not just underneath the Plastazote but
along the edges of the Plastazote, to help secure the foam to the specimen and to hide the foam.
Mostly, the Plastazote cannot now be seen, just the resin. This resin had black pigment applied to make it similar to the colour of the specimen,
to help the mountwork to blend in and not be too obvious to visitors to the museum. These jackets were then secured
to the wooden supports underneath by further applications of the pigmented Jesmonite resin.
The wooden supports were used to get the various elements of the skeleton up to the
required heights to secure the breaks together: different parts of the skeleton were different thicknesses,
but the top surface needed to be more or less the same height. Pieces of wood were secured to one another using PVA wood glue,
and the wood under the deepest pieces of the specimen was raised on batons so fingers could easily be slid underneath to facilitate lifting and moving the specimen. Wood was painted black to help hide it from view.
References:
Larkin, N. and Makridou, E. (1999) Comparing gap-fillers used in conserving sub-fossil material. The Geological Curator 7 (2), 81-90.
For more details about what we can do for you, or for a quote, please contact:
enquiries@natural-history-conservation.com
We are members of the United Kingdom Institute for Conservation of Historic and Artistic Works