Cleaning, conserving and mounting from scratch an Asian elephant skeleton for Cambridge University Museum of Zoology. Nigel Larkin, June 2016
Background to the project
Cambridge University Museum of Zoology underwent refurbishment between 2013 and 2016 as part of a wider redevelopment project.
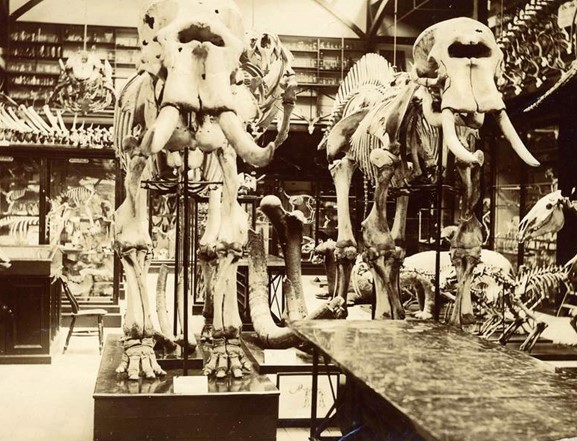
The skeleton of a large male Asian elephant had been on display in the ‘Old Museum’ in the latter part of the 19th century and the first half
of the 20th century (see image below right) but had lain in storage for almost 50 years and the redevelopment project seemed an ideal opportunity to put the Asian elephant back on display. The skeleton had last seen the light of day when it was used as set dressing for iconic scenes in the 1968 epic science fiction film by Stanley Kubrick and Arthur C. Clarke: 2001: A Space Odyssey.
In the scenes early on in the film where primates are seen living in an African landscape many of the bones scattered around the set are from this particular elephant skeleton.
 The specimen sadly has another claim to fame, however. It was shot in 1881 for a very specific reason: it was damaging crops and killing people in Ceylon (now Sri Lanka). The Civil Servant who was sent to shoot the elephant made this entry in his notebook: ‘The Yatiantota Tusker, a notorious and prescribed rogue elephant (bull), that had done much damage to life and property, was shot on 6th February 1881, at Yakkela Kele (“Forest of the Devil’s Stream”), near Malalpola, eight miles from Ruanwela, in the Kegalle district, Western Province, Ceylon. Height, 9 feet; tusks 4 feet 11.5 inches and 4 feet 10 inches outside curve; weight 75lbs’. Mr Y has retained the tusks as a trophy, but I have every hope of obtaining casts of them.’
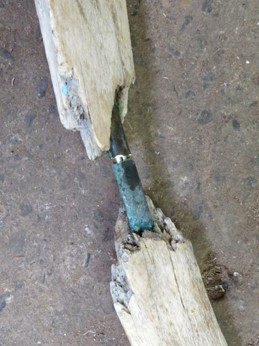
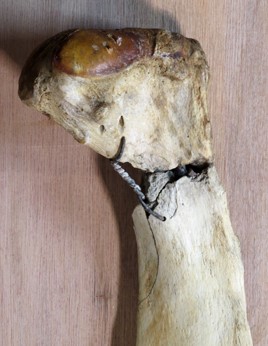
The reason why this animal was ill-tempered and dangerous is clear: its left radius had been broken at some point and become badly infected, fusing to the ulna. The consequent pathological deformation of the bone is very obvious (see images below). The animal would clearly have been disabled and in pain. Other, perhaps associated, pathology in the skeleton is obvious: the ‘chin’ of the lower jaw swells distally and is porous and asymmetrical which is not normal; there are bony overgrowths clearly visible ventral to two vertebrae; also there are abnormal bone growths on the proximal end of the left humerus and in the first left rib and in the scapula. Also, some of the vertebrae are asymmetrical (more than the three shown below). The fact that this animal was suffering from what must have been a painful and debilitating injury and disease may well have led it to become a dangerous ‘rogue’ elephant.
Above right, the elephant skeletons on display in the ‘Old Museum’ (Asian elephant on the left, African elephant on the right).
Below, left to right:
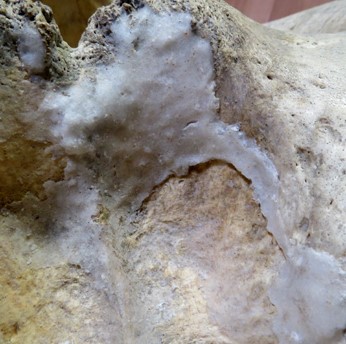
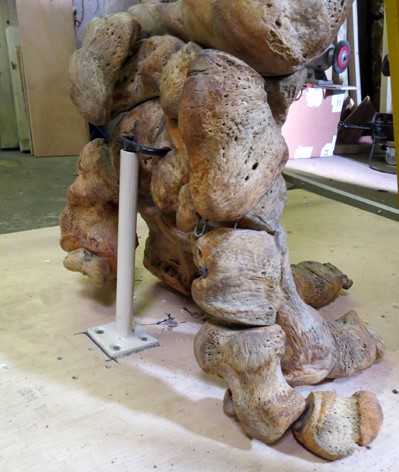
The lower portions of the forelimbs showing the pathologically deformed left radius to the right of the image; the fused left radius and ulna,
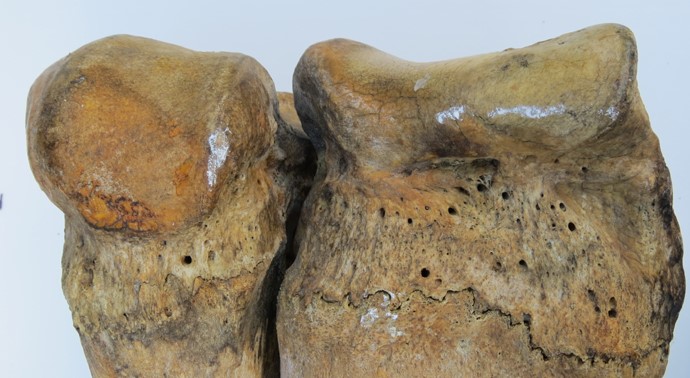
showing the area of deformed bone; a close-up of the diseased area of the left radius; the pathologically deformed left radius fused to the left ulna (on the left of the image) and the normal
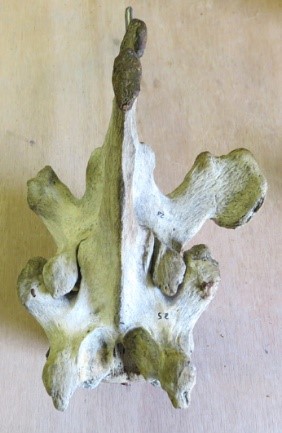
right radius and ulna (on the right of the image); the two vertebrae in the middle of the image each have bony overgrowths
on the ventral surface of their centrum; possible pathology on the tip of the lower jaw.


Below: three asymmetrical vertebrae and on the far right one with the bony overgrowth on the centrum.


The project to clean, conserve and mount the skeleton
Ethics
The specimen was quite dirty from being in storage for 50 years, particularly as many bone surfaces were sticky with natural oily residues and dirt had simply stuck to these areas, turning them black over time. This dirt plus old labels, chalk and paint had to be removed. None of the original armature of the mount survived, except the bar on which the vertebrae were threaded (but this was badly bent and rusty), and most of the brackets that had held the limb bones together were also missing. The skeleton had to be mounted from scratch with new purpose-made armature. As the specimen was of historical significance, where possible it was mounted the same way as before so that old holes drilled in to the bones could be reused, rather than drilling new holes in the specimen and all conservation and cleaning techniques and materials were as minimally invasive as possible. All glues and consolidants used were stable and reversible and all processes and materials used on the specimen were recorded.
Cleaning The whole skeleton required intensive cleaning as it was covered with dust, dirt and grime plus some paint and chalk marks as well as having many areas black with dirt that had stuck to patches of naturally greasy bone. There were some areas where in the past an excessive amount of glue had been applied to breaks in bones and the discoloured adhesive was on the surface of the bone. Also there were scuff marks from where bones had been placed on shelving and moved around. There were many old labels made from a sticking ‘plaster’ roll (as used in first aid) that had to be removed and these left behind a sticky residue that had to be cleaned off.
The bones were cleaned first with soft brushes next to the hose of a vacuum cleaner to remove the debris and dust. Then they were cleaned with a gentle museum conservation detergent, an alcohol ethoxylate (Synperonic A7) in distilled water. It was applied to small areas at a time with a soft brush, then wiped away immediately with a lint-free paper towel. Then the area was cleaned again with clean water (with no detergent) and immediately dried again with a paper towel. The most stubbornly dirty areas, particularly those patches of black greasy bone, were cleaned again in a similar fashion but with acetone added to the Synperonic A7 and water, applied this time with stiff brushes. Such cleaning often had to be undertaken multiple times before the dirt was fully removed. The sticky plaster labels and their residues were removed very carefully with scalpels, as was the old excess adhesive. In many places there was either a thin film or sometimes a thick deposit up to 4 or 5mm thick of a white waxy substance, particularly on the skull. This was removed with thin wooden spatulas and stiff brushes, and some of it has been kept for analysis.


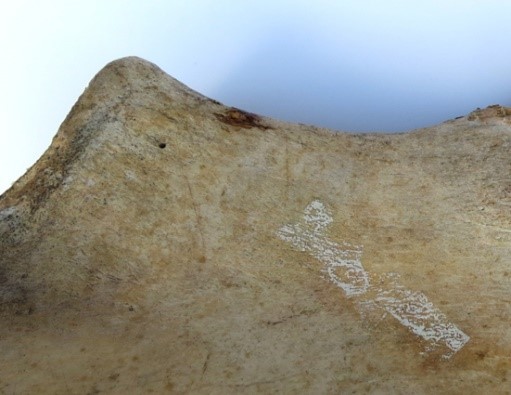
Above left to right: examples of the waxy substance on the surface of the skull; examples of dirty bones before cleaning, with paint and chalk marks etc;
and (last image) sticky residues left behind by plasters used as labels.


Above far left: the shaft of the left femur with the upper section cleaned and the lower section still dirty. Above left: the pelvis with the right side cleaned and the left side still dirty. Above right: The lower left section of this humerus is yet to be cleaned. Above far right: the same piece of bone after cleaning.
Conservation and Mounting All the supporting metalwork and brackets had to be designed and made in a way that meant the specimen could be fully mounted in the conservation workshop and then disassembled and transported to the museum and assembled again relatively easily whilst also providing as secure a support to the whole skeleton as possible, considering that the specimen would be positioned on a plinth about 3 ft high which would need to be moved occasionally.
The metalwork (T-shaped in cross-section) that the vertebrae had been stored on for the last 40 to 50 years (inserted through the vertebral foramen of each vertebra) was the only substantial piece of the original mount that survived. The rest of the mount was missing. This metal bar for the vertebrae was thick with rust and at some point in the past had been bent quite badly. The vertebrae had to be removed from this metalwork (after being numbered with pencil) to be cleaned and also so that the metalwork could be cleaned (the thick rust needed to be removed) and straightened. This was heated and bent back into the right shape (i.e. straight in its midline), was cleaned with an angle grinder using an abrasive ‘flap-disk’, and was painted to match the bones.


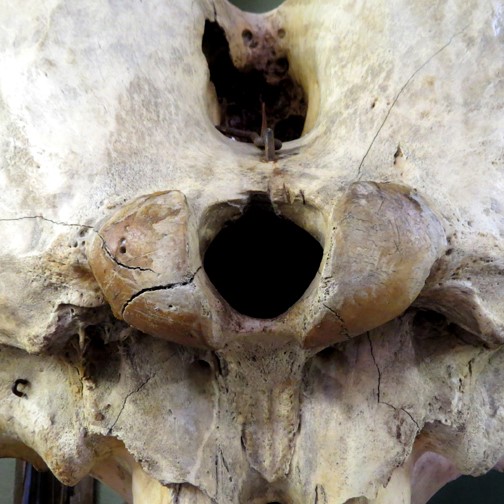

Above far left: the elephant skeleton in storage. Above left: the rusty vertebral bar (the thin vertebral rod here has been cleaned in an attempt to remove it from the centrum). Above right: the rear of the skull showing cracks around the occipital condyles. Above far right: a floor plate welded to the bottom of an upright support, through which a threaded bar runs.
The main upright supports had to be made from scratch. From the single old photograph that was available showing the skeleton as it was previously mounted, it looks like there had only been two upright supports used before. However, there are severe cracks in the rear of the skull around the occipital foramen (see image above) which would have taken the strain of the weight of the skull, mandible and tusks whilst simply balanced on the end of the vertebral bar, hooked to the atlas vertebra. For this reason, and because the skeletons would need to be moved around the gallery occasionally on the plinths and so would need to be extra secure and not sway when being moved, a third upright support was required to go underneath the skull to take the weight of the skull and mandible separately, to ensure that the whole structure was stable and that the rear of the skull was not put under any pressure. Therefore three upright steel tubes were cut to the right length to fit i) under the pelvis, ii) between the
front legs and iii) underneath the skull (all at different heights). Threaded bar was inserted into the lower sections of these tubes, protruding by several inches and was welded to the bottom end of the tube. A floor plate was then welded on at the base of the tube to make a collar that would sit on the top of the wooden plinth, each with four holes so that they could be screwed to the top of the plinth. Each of the three threaded bars inserted into a hole through the plinth and on the underside of the plinth ran through a specially made metal bracket (to reduce the ability of the upright poles to lean sideways) and was secured on the other side of this with nuts and spring washers. This provided three very secure, robust upright vertical supports to take the weight of the vertebrae, ribs, skull, tusks, mandible and humeri. A long metal bracket was made to hold the rear and middle upright tubes exactly the right distance apart from one another (shaped to fit the contour of the underside of the vertebrae), attaching to the top of these two uprights with collars secured with grubs screws. By heating and shaping lengths of steel, bespoke brackets were made for the pelvis to sit comfortably above the rear pole and for the cervical vertebrae to sit on the middle pole and for the skull to sit on the front pole. Each was lined with white inert Plastazote foam so that none of the bones were simply sitting directly on metal. A small hole in each side of the skull bracket allows screws to secure the skull in place to prevent any slippage to one side or the other.


Above far left: the Plastazote foam-lined support for the neck region, inserted into the top of the middle upright support.
Above left: the Plastazote foam-lined support for pelvic region, inserted into the top of the rear upright support.
Above middle: The secure bracket made for the skull.
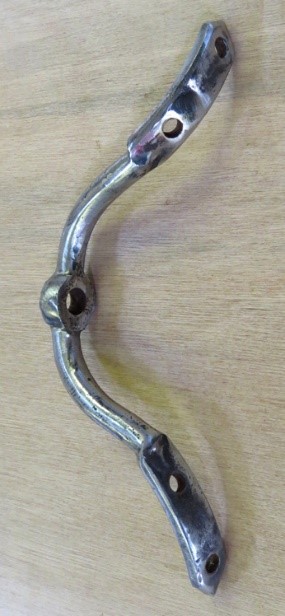
Above right: one of the five brackets made on the forge to hold the lower limb bones in articulation with the upper limb bones.
Above far right: one of the four upright brackets made to hold the feet in place.
The upright tube at the front that supports the skull, tusks and mandible had a brace made for it to make sure that the top-heavy upright tube and its load stays upright and straight. This brace is made from a single length of flat metal heated and bent to shape, with a bracket welded to its centre that bolts to a bracket on the front upright support. Its ‘feet’ each have a pair of holes drilled in them so that it can be screwed on to the top of the plinth.
Five out of eight of the brackets that hold the lower limb bones to the upper limb bones were missing and had to be made from scratch using a forge, anvil, hammers and angle grinder. Some of the threaded bars that had been inserted into the ends of the limb bones that these brackets attached to were missing and some were present but bent. Therefore some had to be bent back into position and some had to be replaced.
A horizontal rod with threaded bar at either end was made to hold the humeri in position, using the existing wide holes running through the shaft of each bone where it had been supported before. This was attached to the middle upright support with nuts and bolts attaching to a bracket secured to the tube with a grub screw secured with an Allen key.
Some of the small pieces of original metalwork were very difficult to remove. The bracket on the underside of the mandible was very rusty and needed to be removed to be cleaned but the bolts were impossible to shift with screwdrivers, no matter how much cleaning was undertaken on the bolt heads and even after WD40 had been carefully applied to the metalwork a few times. In the end a small ‘pen’-sized blowtorch was used to heat the rusty metal bracket and un-seize it from the bolts which were then eventually unscrewed. The bracket and the bolts were cleaned with spinning wire brushes to remove the rust and were then painted like the rest of the metalwork to match the bone.


Above, left to right: The bracket on the underside of the mandible, very rusty; a close up of the rusty bracket once it was removed; the bracket after removing the rust and cleaning it; and the bracket back on the mandible after painting.
Many toe bones were not attached to the articulated feet and these had to be identified from the bag full of ‘spare bits’ that came with the skeleton and were then re-attached using fresh thin wire. Some old thin rusty wire holding bones on the foot was brittle and had to be replaced. Supports needed to be made for each of the feet, consisting of an upright tube of the right length welded to a base plate that could be screwed to the top of the plinth so that the bracket from the rear of each foot could slide into the top of the tube. One of these brackets on the rear of the feet was missing and had to be made as well.
The ribs were reattached to the vertebrae in the usual way with thin wires using the old holes (after all the old bits of wire had been removed) and the ribs were secured in place near their distal ends on one long thin strip of metal on each side. Many ribs needed new small holes to be drilled in them so that thin wire could be used to secure them to the metal strip. Four ribs were broken historically and required repair. This was undertaken with Paraloid B72 used as a consolidant and adhesive then plaster of paris was used to fill the small gaps as necessary and one large gap between pieces in one instance.


Above far left and left: a broken rib (L7) requiring extensive repair and gap-filling. Above right: another rib (L2) requiring repair and gap filling. Above far right: the same rib after repair but before painting-out the plaster.


Above: general shots of the skeleton being mounted.
Replicating the tusks The two tusks were replicas of the originals, made of solid plaster when the animal was defleshed in the early 1880s.
These would have added substantially (and unnecessarily) to the weight of the skull, pulling the whole specimen forward.
Therefore the plaster tusks were moulded in silicone rubber and cast as hollow replicas in lighter Jesmonite acrylic resin, saving about 22kg of weight.
These resin tusks were painted appropriately and look more realistic than the plaster originals (images of the original plaster tusks below).


Above: The original solid plaster casts in rather poor condition. Below: installing the new, lighter, Jesmonite resin casts.


Above: the Asian elephant mounted but with the tusks and metalwork yet to be painted.
For more details about what we can do for you, or for a quote, please
contact:
enquiries@natural-history-conservation.com
We
are members of the United Kingdom Institute for Conservation of Historic and
Artistic Works