The cleaning, conservation, mounting and installation of the large Stigmaria fossil Ĺtreeĺ from Brymbo steel works in North Wales, Nigel Larkin 2015/16.
 Introduction:
Recently notified as a SSSI, Brymbo Fossil Forest in north-east Wales has attracted
widespread attention since its discovery in 2004. Hundreds of well-preserved
fossils have been found and many are already being conserved at Amgueddfa Cymru -
National Museum Wales - in Cardiff. However, one of the most iconic and
visually impressive specimens required specialist conservation work for an
exhibition at Wrexham Museum in January 2016.
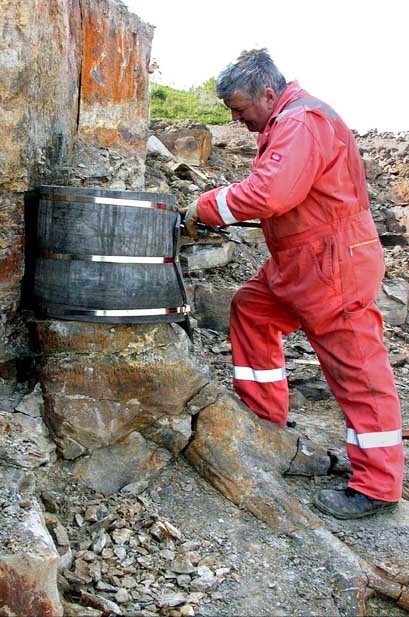
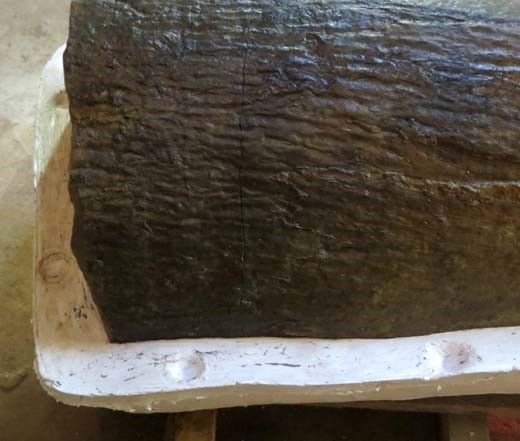
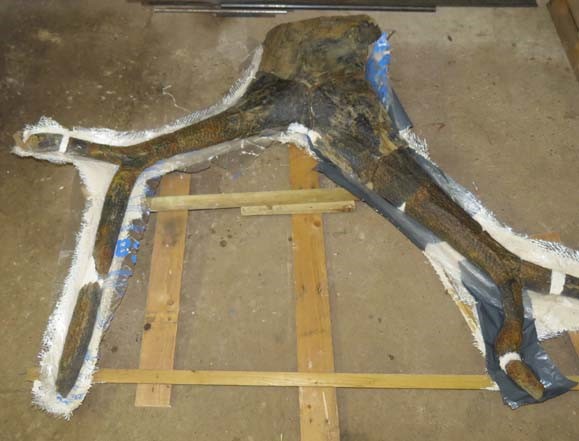
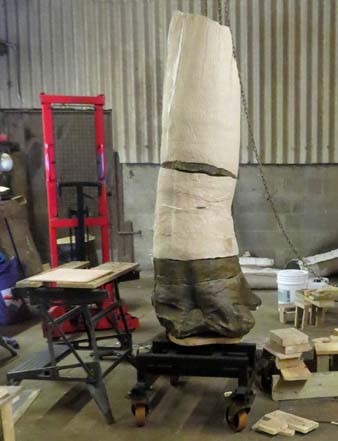
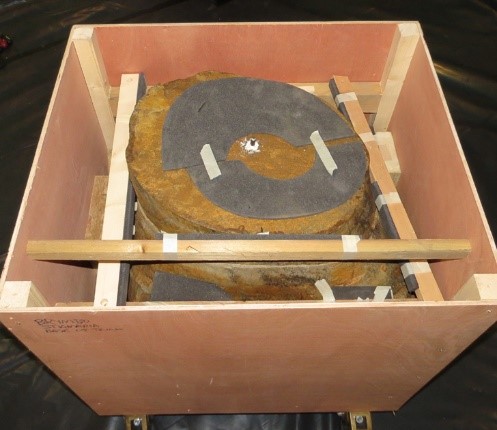
This large fossil specimen (2.25 m high and a root spread of 3.5m) with great surface detail was revealed during excavations in Carboniferous sediments
at the former Brymbo Steelworks in 2005 (see photo to the left, courtesy of Peter Appleton).
It is a very rare example where a large proportion of the trunk is still attached to the stigmarian root base (see photo to the right and various photos below).
More can be read about the specimen in an Earth Heritage article here.
The specimen needed extensive cleaning, conservation and reconstruction along with designing and making an appropriate supporting mountwork so that it could be
displayed. The combined weight of the pieces of the Ĺtrunkĺ was about 0.8 metric tonnes.
Therefore the central piece of metalwork that the trunk was to be mounted on was designed to safely accommodate at least 1 tonne.
Introduction:
Recently notified as a SSSI, Brymbo Fossil Forest in north-east Wales has attracted
widespread attention since its discovery in 2004. Hundreds of well-preserved
fossils have been found and many are already being conserved at Amgueddfa Cymru -
National Museum Wales - in Cardiff. However, one of the most iconic and
visually impressive specimens required specialist conservation work for an
exhibition at Wrexham Museum in January 2016.
This large fossil specimen (2.25 m high and a root spread of 3.5m) with great surface detail was revealed during excavations in Carboniferous sediments
at the former Brymbo Steelworks in 2005 (see photo to the left, courtesy of Peter Appleton).
It is a very rare example where a large proportion of the trunk is still attached to the stigmarian root base (see photo to the right and various photos below).
More can be read about the specimen in an Earth Heritage article here.
The specimen needed extensive cleaning, conservation and reconstruction along with designing and making an appropriate supporting mountwork so that it could be
displayed. The combined weight of the pieces of the Ĺtrunkĺ was about 0.8 metric tonnes.
Therefore the central piece of metalwork that the trunk was to be mounted on was designed to safely accommodate at least 1 tonne.
Condition of the specimen: The specimen was in about 90 pieces: four heavy sections of trunk, three of which each weighed about a quarter of a tonne,
and the rest were pieces of root weighing up to about 20kg. After storage on site for a decade they were all dusty and dirty, and had bird droppings etc over their surfaces along with cobwebs
and other detritus. Some matrix still adhered to the root surfaces in places and some of the surfaces of the fossil were flaky and friable.
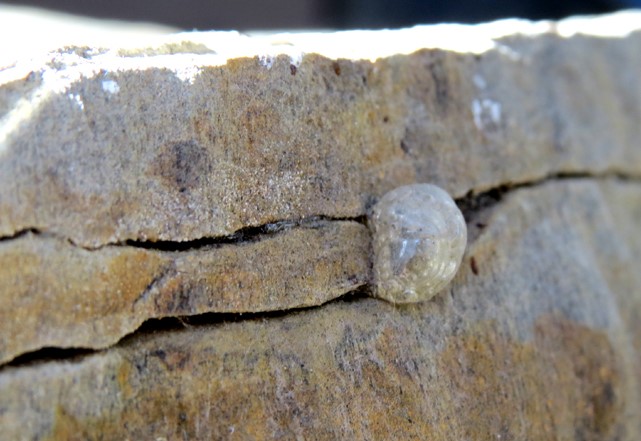
There was some excess adhesive bubbling up from between cracks from previous repairs during the original excavation and this needed to be removed.
Under the dirt, the detail of the surface structure of the specimen was superb so for this to be appreciated -
as well as to remove biohazards and to have clear surfaces for gluing sections together ľ all the surfaces had to be thoroughly cleaned with an adequate
method to remove all the dirt and any unwanted matrix without causing any damage to the friable and flaky surfaces.
Cleaning the specimen:
Initially, a very soft wide artistĺs brush was used to clean the surfaces alongside a vacuum cleaner with gauze taped over the end (to prevent the loss
of small pieces). Stubborn areas - of dried bird excrement for instance - required stiffer brushes and occasionally cleaning with an airabrasive unit
utilising compressed air, where necessary lightly laced with sodium bicarbonate powder. Some excess matrix was removed with scalpels.
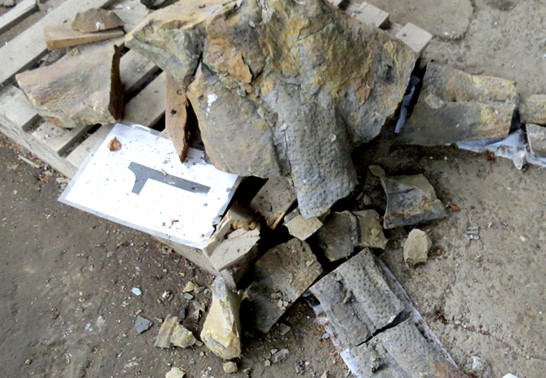
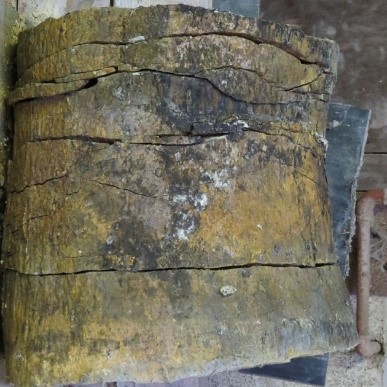
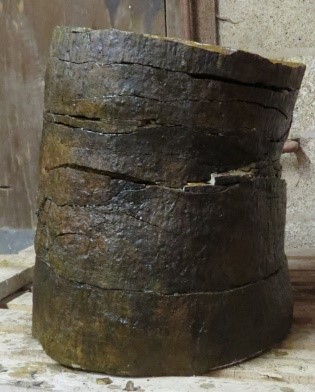
Above left: the specimen required quite a bit of repair. Not only was it collected in pieces, it had suffered further deterioration since excavation.
Above middle: after cleaning, many breaks required not just consolidating and gluing but gap-filling.
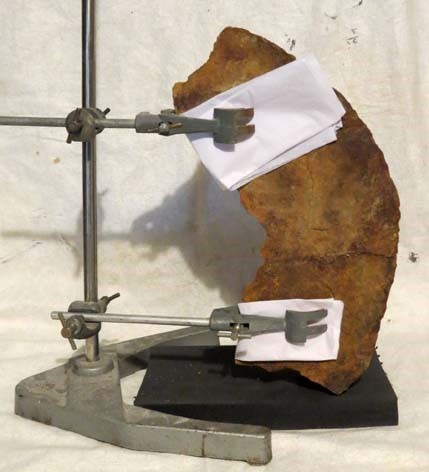
Above right: some adhesive used during excavation required tidying and removing.
Conserving and rebuilding the specimen: All cleaning and conservation work undertaken on this specimen was as gentle,
non-invasive and reversible as possible. An appropriately reversible conservation adhesive and consolidant was used where required.
Once all of the pieces of the specimen were clean, the smaller segments of Stigmaria root could be glued back together where appropriate to
form sections that were not so big and heavy that they would break under their own weight nor were too difficult to lift. Such repairs were undertaken with
reversible adhesives after the surfaces of the join were consolidated. Small gaps where there were breaks and parts of the fossil were missing were
filled with plaster of paris which was painted with artistsĺ acrylic paints. All the surfaces of the specimen ľ roots and Ĺtrunkĺ -
were consolidated with a couple of applications to strengthen the friable surfaces, give them long-term protection and to bring back the natural
colour to the specimens. Bespoke permanent pallets that were suitable for display were made for the heaviest sections of the trunk (some weighing over
a quarter of a tonne). These pallets were then painted black and the specimens were manoeuvred carefully on to them, with Plastazote foam between the specimens
and the wood.
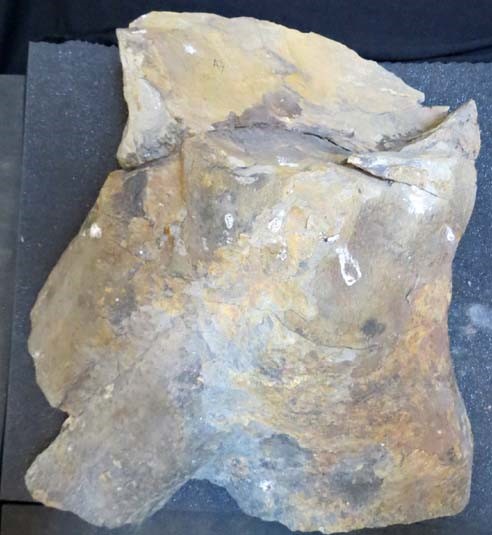
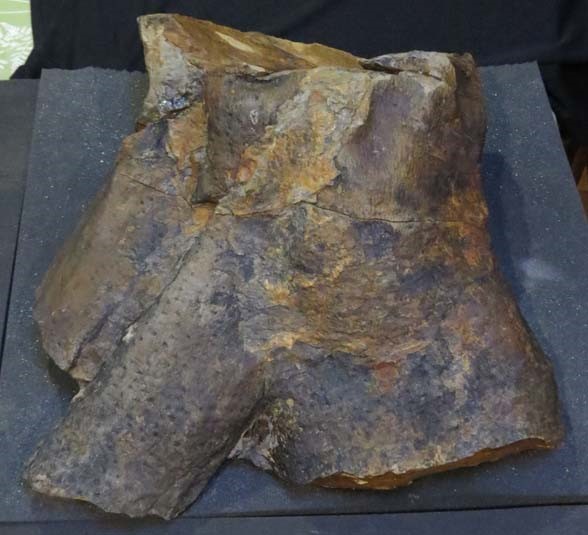
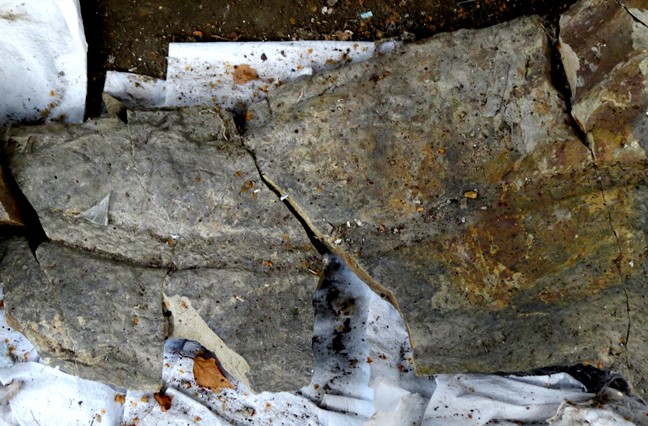
Above, the proximal portion of the rear root (showing bird droppings) before cleaning and conservation
(far left) and after cleaning and conservation (left). Above right: gluing pieces together, holding them in place.
Above far right: example of gaps filled with plaster.
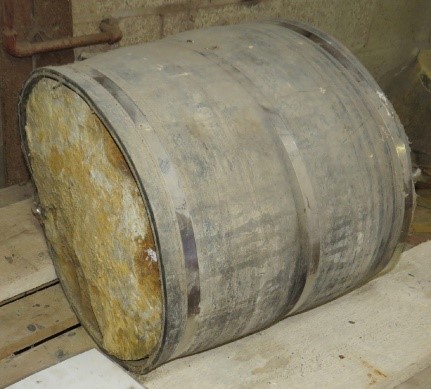
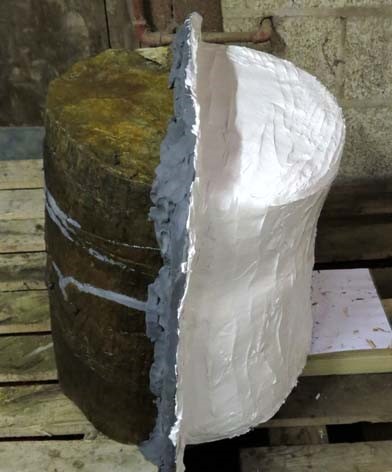
Above: Section no.4 (weighing about 210 kg). Left, in its rubber field jacket; middle, before cleaning and consolidation; right, after treatment.
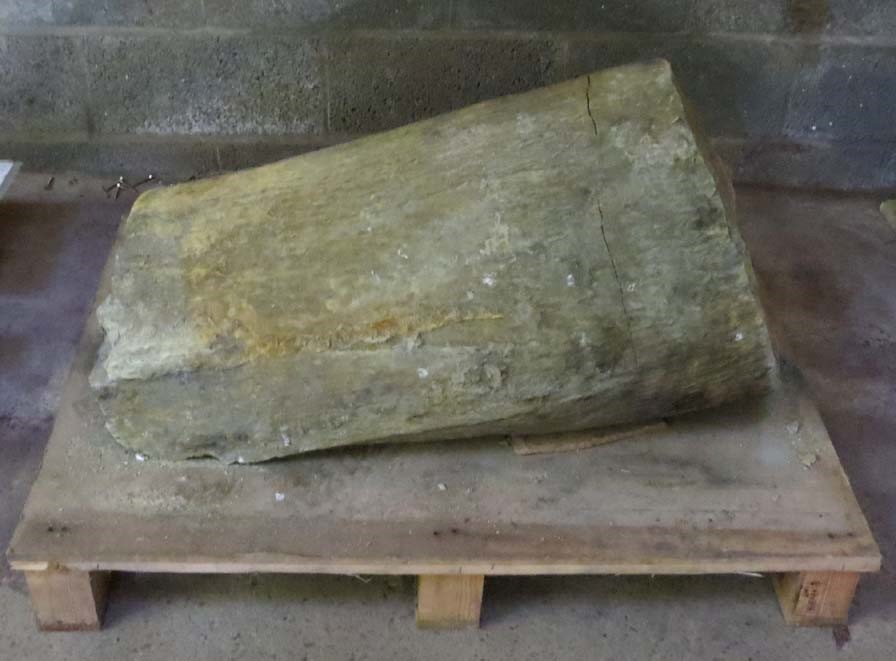
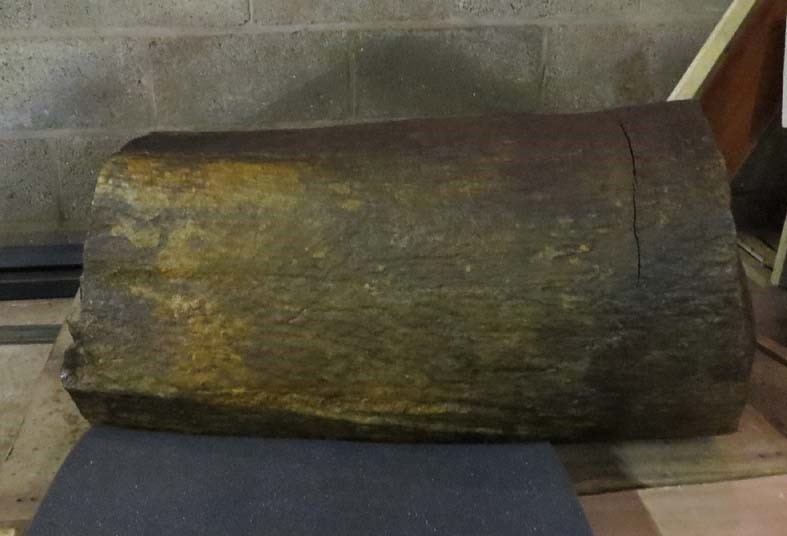
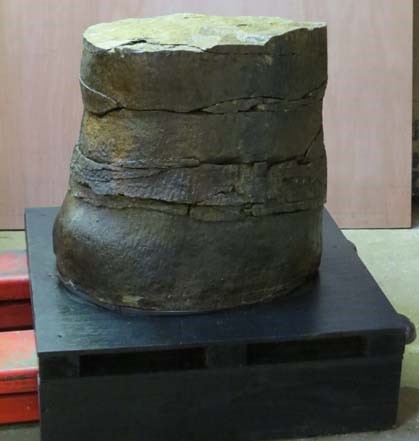
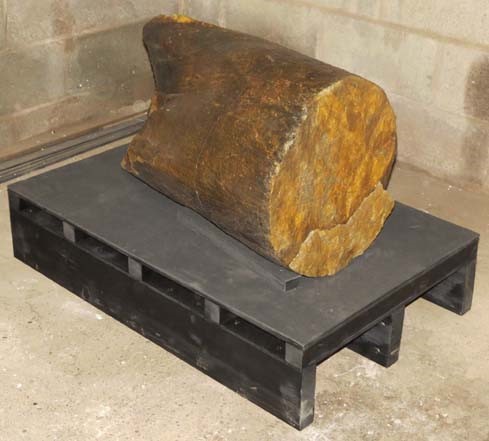
Above, section 5 (weighing about 265 kg) before cleaning and consolidation (far left) and after (left). Section 4 (above right) and section 5 (above far right) on their sturdy permanent bespoke pallets.
Moulding sections of the Ĺtrunkĺ to make casts: The two topmost sections of the Ĺtrunkĺ were so heavy (approximately 210 kg and 265 kg respectively) that they presented serious challenges in
terms of health and safety if they were to be placed on top of one another and on top of the lowermost section of the trunk,
as well as posing a significant risk of damaging the lowermost section in the process. Therefore the decision was taken to make moulds of the two pieces
and produce painted casts to place on the lowermost section of the Ĺtrunkĺ. However, due to the size and weight of the fossils - and the fragility of one
section which was excavated in pieces and held together by adhesive and consolidant ľ simply making the moulds also presented a significant challenge.
The large specimens had already been cleaned and consolidated and placed on Plastazote foam on sturdy bespoke pallets.
To prepare both sections for the moulding process more consolidant was applied to ensure the surfaces were well protected.
All the cracks and gaps in the specimens then had to be filled to stop the moulding rubber from penetrating the fossil when it was applied.
If this was not done and the rubber penetrated the cracks, gaps and holes and then set, during the de-moulding process the mould would tear in some places,
leaving rubber behind in the specimen and in other places it would break the specimen apart and the rubber would take pieces of the fossil with it.
Most of the gaps were filled with reversible water soluble putty (polyethylene glycol 4000, glycerol, water and precipitated chalk)
but the many large gaps in poorly preserved section were carefully filled with low-oil plasticine (quicker and less expensive to use and remove than the
water soluble putty, but it would be difficult to fully remove it from smaller gaps and cracks). As two-part moulds were to be made, a plasticine Ĺdamĺ
was constructed along the midline of each specimen, ensuring the line of this followed the best route along the contour of the fossil so that the Ĺflashlineĺ
(where the two pieces of the cast would eventually join) would be the least visible possible and so that the two sections of the mould would come apart most easily.
Mounds were made in this plasticine dam to produce Ĺkeysĺ so that the two halves of the mould would lock together securely when making the cast.
The specimens were now ready for the moulds to be made.
Specialist silicone rubber was used for the soft parts moulds (about 40kg was required) and the rigid portions of the moulds were made with several layers
of acrylic resin and woven glass fibre. Once this had set, the plasticine dam and its wooden supports were very carefully removed and the specimens were turned over
without damaging or disturbing the mould and work could begin on the second half of the mould. Once the moulds were made, they were carefully removed and the specimens were cleaned of all the plasticine and
water soluble putty. The casts were made from acrylic resin with woven glass fibre matting. The combined resin cast - approx. 150cm tall by 50cm diameter -
was painted with artistsĺ acrylic paints to match the original specimens.
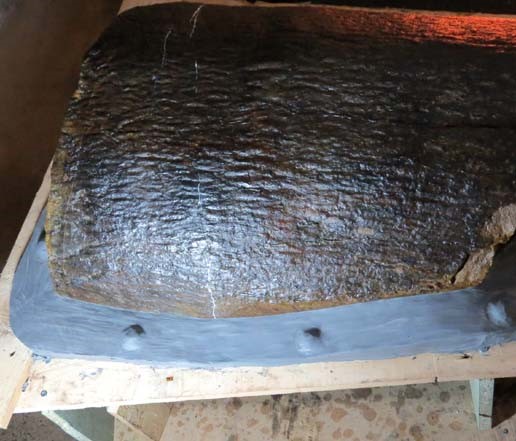
Above left: Section no.5 laid-up ready for moulding, showing the plastecine dam with numerous mounds acting as Ĺkeysĺ.
Above middle: Section no.5 now the other way up, with the first half of the mould on the underside, showing the Ĺkeysĺ in the rubber as depressions.
Above right: making the mould for section no.4. This section was so fragmentary and vulnerable that the first half of the mould had to be made whilst the specimen was in a vertical position which was less than ideal.
Manufacturing a bespoke permanent metal mount: The metal mountwork required to support the roots and the Ĺtrunkĺ had to be modular so that the specimen could be dismantled and re-assembled
in sections for display or storage. This would also help to ensure that no single section was too heavy to be moved manually, but also meant that there would be a
choice of which roots would go on display, depending on the space available at any future location (i.e. the rear root could be left in storage and the specimen
position close to a wall behind it). Appropriately enough, considering that the fossil was found at Brymbo steelworks with a stradition of making steel
going back more than 130 years, steel was used throughout the mounting process.
The main base of the Ĺtrunkĺ (weighing over a quarter of a tonne) had to be easily manoeuvrable so that it could be positioned exactly where required
and therefore would have to be on wheels but these wheels also had to be lockable, to keep it securely in place.
The metalwork would have to be lined with inert Plastazote foam (black, to blend in) where the fossil would otherwise touch the metal,
to keep the fossil from being damaged.
All the pieces of the roots were assembled together as tightly and snugly as possible against the base of the trunk in their correct positions,
resting them on temporary wooden Ĺtablesĺ and piles of wooden offcuts to get each piece to the right height and wedging them in place with wood and cardboard,
to see where the tips of the roots ended. The very lowest root tips needed to be just above the floor. Everything had to be raised higher a few times before
the base of the trunk was at the most suitable height, with the lowermost tips of the deepest roots almost touching the floor.
Detailed photographs and measurements were taken of the layout and in particular of the exact height of the underside of the base of the trunk and its
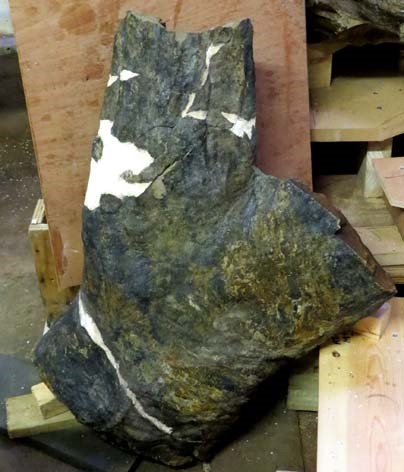
shape so that the wheeled mount could be designed and made. Major gaps where pieces of the fossil were missing were filled with plaster of paris,
shaped with knives, scalpels, files and sandpaper..
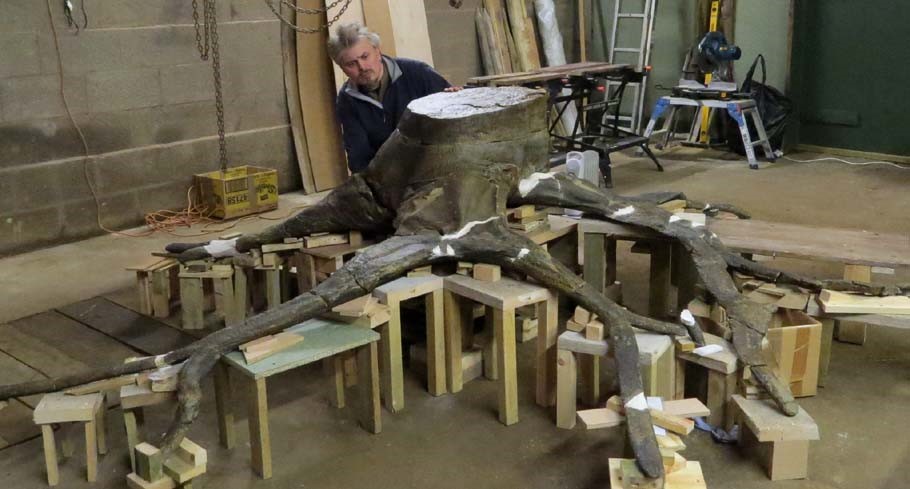
Above: all the white pieces in the specimen are where large gaps were filled with plaster of paris.
Once all the pieces of the roots were sitting in as tight a fit as possible to one another and to the base of the trunk,
metal Ĺcradlesĺ had to be made for the underside of each section - but this could not be done whilst the roots were in their correct orientation as the work needed to take place on their undersides.
The roots would have to be turned upside-down whilst maintaining their exact three-dimensional relationships.
Therefore temporary bespoke jackets had to be made for each root that could correctly maintain their exact three-dimensional position when turned
over the other way. Sheets of plastic were cut to a variety of sizes to lay over the top sides of every root, then acrylic resin and glass fibre was applied
in layers to build up a thick sturdy jacket. Multiple splints were added to each jacket as required, screwing wooden batons to one another and securing them in
place with more resin and glass fibre. As each jacket was completed it was carefully removed, turned upside-down and the pieces of the root laid within the jacket
in their correct association and position.
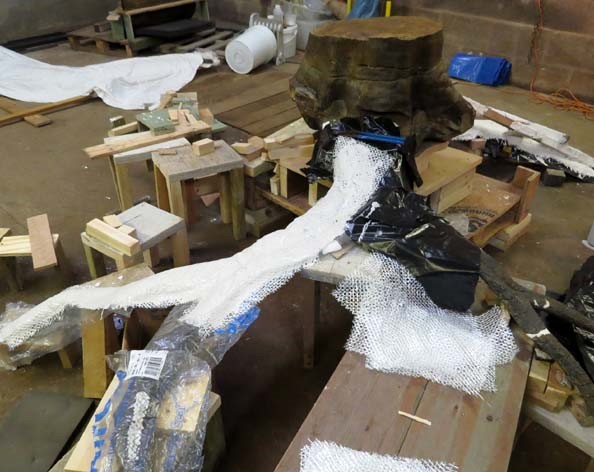
Above left: making the temporary support jacket for the upper side of the right root. Above right: the left root lying (now upside-down) in
its temporary support jacket ready for the metal brackets to be made.
This meant that brackets could now be made for the undersides of each section of root. Sections of flat steel 20mm wide and 6mm thick were heated,
shaped and welded together to make a suitable cradle or bracket for each section. The sections of root were then taken out of their upside-down jackets
and reassembled on the temporary wooden tables, piles of wood and wedges of cardboard to get them back into their positions again the right way up around
the base of the Ĺtrunkĺ, but this time sitting within their new metal brackets. Once they were tightly back in place in as good a fit as possible,
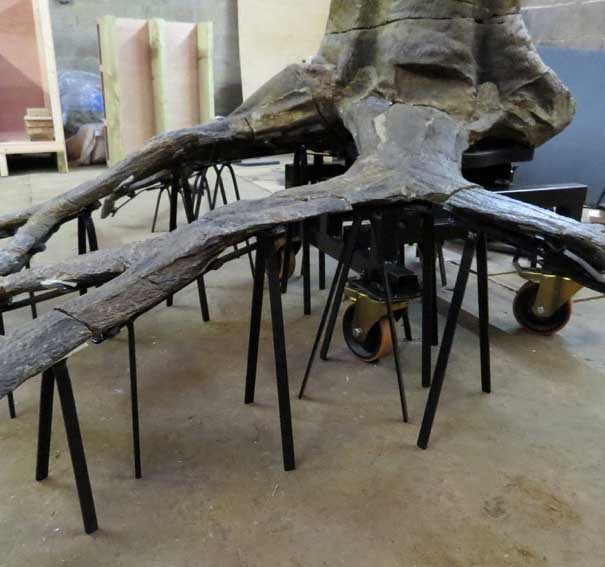
the legs for the brackets could be made. Generally an inverted ĹVĺ shape would make two legs at the proximal end of the bracket where the heaviest weight was
to be taken, and at the distal end a single rod would be used for a leg, creating a Ĺtripodĺ effect so there should be no wobbling.
In some cases, due to the shape of the root and the distribution of weight more legs than this would be required.
At the proximalmost sections of each root, the pieces were so heavy that many more legs were required.
The metalwork was sprayed black and Plastazote foam strips were cut and placed between the metalwork and the fossil to protect the specimen from damage.
Then the sections of mount were labelled on their rear ends and all the root sections were reassembled to check that they still made a good fit.
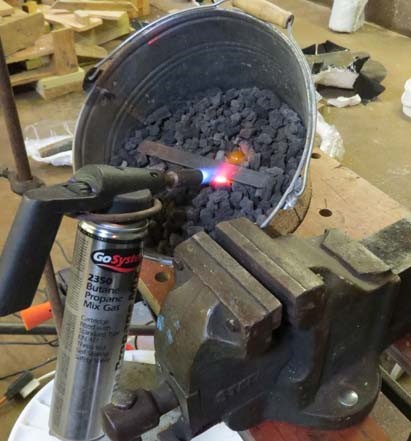
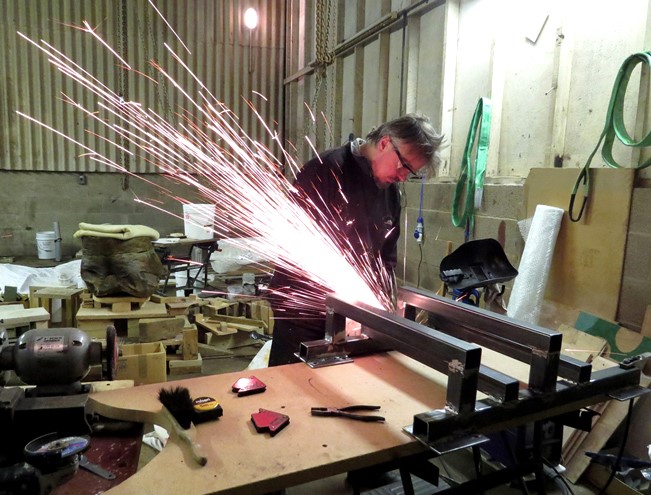
Above left: heating a short section of flat steel bar with the blowtorch before shaping it. Above right: making the main base for the Ĺtrunkĺ.
Making the support on wheels for the Ĺtrunkĺ:
This support would need to permanently take the weight of the lowermost section of the Ĺtrunkĺ, which weighs about a quarter of a tonne,
and also either the cast of the rest of the trunk or possibly at some point in the future the actual fossils of the rest of the trunk,
a combined weight of over three-quarters of a tonne. But it also needed to be on wheels (that also could cope with up to a tonne in weight)
to make it manoeuvrable and the top surface had to be exactly the right height. It could easily be top heavy and unstable once the base of the trunk was on it, so the mount had to be kept
as broad as possible without interfering with the brackets and legs for the roots. To get the height and be able to take the weight and to spread the weight,
box section steel girders 50mm wide each side were welded to one another in layers at various angles dictated by the shape required and to get height required
above floor level dictated in turn by the depth to which the deepest root plunged to. The lockable extra heavy duty polyurethane wheels (150mm diameter)
can each take 800 kg. The swivel plates of these were bolted onto steel plates with pre-drilled holes that had been welded in place on the mount.
Once the mount had been made and the wheels bolted in to place, three right-angled brackets with pre-drilled holes were welded into place so that when the mount
was wheeled into position and the lowermost section of the trunk on its MDF base was lowered exactly into place with the hoist, the mount could be secured to the
MDF base with screws running through the holes in the brackets. In turn, the lowermost section of the Ĺtrunkĺ had already been held in place on the MDF base with
strategically shaped and placed wedges of MDF glued to the base. All the MDF was painted black, to match the metal mounts that had been sprayed black.
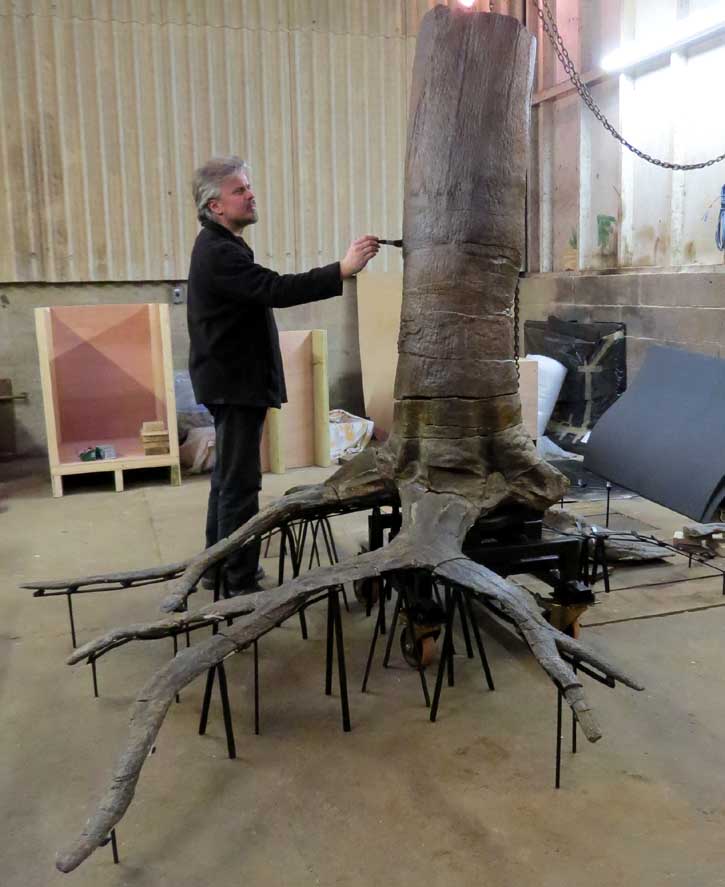
In the end the 2.25m tall, 3.5m wide, 1 tonne specimen (including all the roots) was suported by 4 wheels and 55 legs.
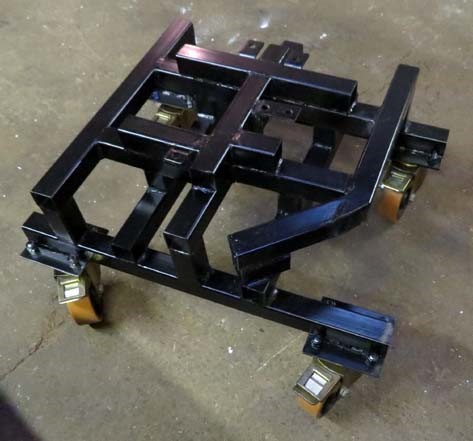
Above far left: the completed mountwork on wheels for the base of the Ĺtrunkĺ.
Above left: the wheeled mount in place under the base of the Ĺtrunkĺ with the unpainted cast in place.
Above right: some of the legs suporting the roots, with the wheeled base behind. Above far right: the specimen almost completely mounted, with the large cast of the trunk being painted.
Packaging and transport: A large plywood and baton pallet and crate was made for each of the three roots (left, right and rear).
The bases of these crates were lined with Plastazote foam, bubble wrap and acid-free tissue paper before the largest piece of each root was laid on
top and securely wedged in place with acid-free tissue and bubblewrap. The more acid-free tissue, bubble wrap and more acid-free tissue was laid on top of it
and the next largest pieces of root were laid beside the former, or on top, and so on until all the pieces of the root were packed securely without abrading
one another or placing too much weight on one another. A plywood shelf was inserted above, resting on batons screwed to the inside of the upright plywood sides.
This was lined with Plastazote foam and then the relevant mounts for the fossil roots already in the crate were placed on this, separated from one another with
cardboard and bubble wrap so that they did not knock against one another and chip the paintwork.
The heavy sections of upper Ĺtrunkĺ that had been moulded and cast and which were to be displayed as they were on their bespoke pallets
(which had been painted black) were covered in bubble wrap and then a plywood and baton crate was assembled around them, with the sides screwed to the pallets.
Wooden beams of suitable sizes were screwed on the inside of these crates to secure the large pieces of trunk in place so that they would not shift within the
crate when in transit. The wooden beams were separated from the trunk with several layers of bubble wrap, so that they did not harm the surface of the fossil.
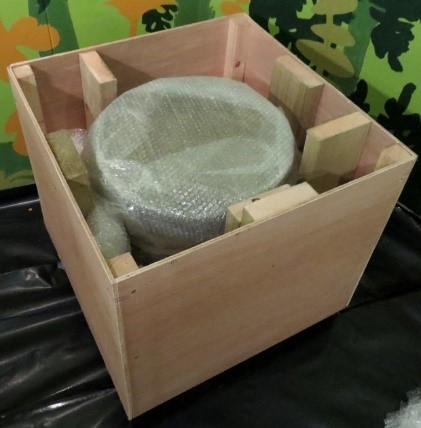

Above left: trunk section no.4 in its crate, showing how it was kept securely in place. Above middle: the base of the trunk secured in its crate with foam-lined batons. Above right: the metal stands in the upper section of one of the root crates, separated from one another with cardboard and bubble wrap.
Installation in Wrexham Museum:
The whole specimen was successfully mounted in Wrexham Museum as part of their 'Swamplands' exhibition (January 2016 to June 2016).
After this display is over the specimen will be taken to National Museum Wales in Cardiff where it is hoped it will be put on display.
Eventually it might form the centrepiece of an exhibition in the redeveloped Brymbo Fossil Forest
and Steelworks Heritage Centre ľ to be appreciated by former local steelworkers and visitors alike. There are few places where such a complete
specimen of this iconic Carboniferous plant can be seen with the trunk and root together.
Brymbo Developments Limited kindly donated this specimen and others from the site to National Museum Wales. The conservation and mounting project was funded by:
Amgueddfa Cymru/National Museum Wales (AC-NMW); Natural Resources Wales (NRW); and Wrexham County Borough Council (WCBC).
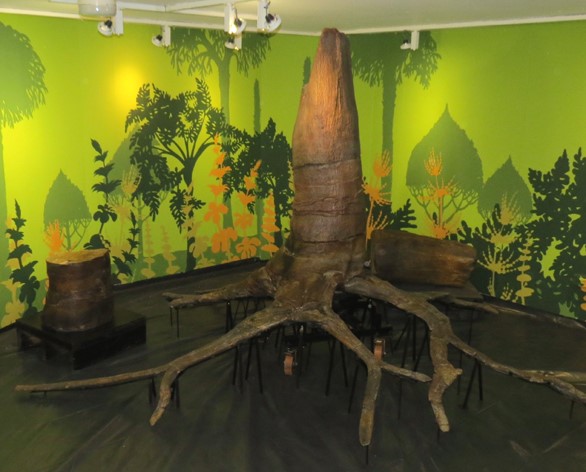
Above: the specimen installed at Wrexham Museum.
For more details about what we can do for you, or for a quote, please
contact:
enquiries@natural-history-conservation.com
We
are members of the Institute of Conservation.