Chideock Manor whalebone arch: cleaning, conservation, repair, remodelling and making supports
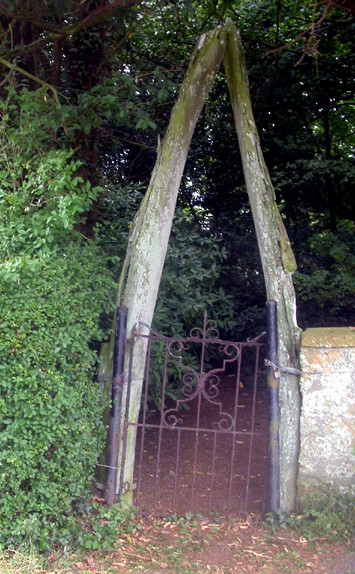
 This specimen comprises the two bones of the lower jaw of a large balenopterid whale and stands over three metres high, with another
metre or so buried in the ground. The arch had been standing outside in all weathers since about 1880, and inevitably had deteriorated during the
ensuing 130 years (see image on the left - the image on the right was taken after the project). Without conservation, it would have continued to deteriorate
at an accelerated rate as much of the protective, denser, outer bone
had been weathered away from the outside surfaces of the arch to expose the porous and fragile inner bone material (see below). This was now exposed
down most of the right and front sides of the right bone and the front of the left bone – thin strips of surface bone were still peeling away on this
side (see below) and many pieces were loose on the ground around the arch. Half of the width of the bone on the right was completely missing in the worst
affected areas, weakening the whole structure considerably. The lower portion of the left bone had deteriorated completely where it was embedded in the
earth bank. It had rotted to the consistency of sponge, and much of the internal structure of the bone had completely disintegrated. The surfaces of
the underside of the arch were in better condition, but were still split towards the base. Ivy was still growing in some of these cracks (see below).
This specimen comprises the two bones of the lower jaw of a large balenopterid whale and stands over three metres high, with another
metre or so buried in the ground. The arch had been standing outside in all weathers since about 1880, and inevitably had deteriorated during the
ensuing 130 years (see image on the left - the image on the right was taken after the project). Without conservation, it would have continued to deteriorate
at an accelerated rate as much of the protective, denser, outer bone
had been weathered away from the outside surfaces of the arch to expose the porous and fragile inner bone material (see below). This was now exposed
down most of the right and front sides of the right bone and the front of the left bone – thin strips of surface bone were still peeling away on this
side (see below) and many pieces were loose on the ground around the arch. Half of the width of the bone on the right was completely missing in the worst
affected areas, weakening the whole structure considerably. The lower portion of the left bone had deteriorated completely where it was embedded in the
earth bank. It had rotted to the consistency of sponge, and much of the internal structure of the bone had completely disintegrated. The surfaces of
the underside of the arch were in better condition, but were still split towards the base. Ivy was still growing in some of these cracks (see below).


Porous and fragile inner bone exposed to weathering, and strips of bone curling away from the arch after getting wet and then warping when drying out
Although the two bones were in need of urgent attention they were too vulnerable to be dismantled and taken away for conservation, as this would
have risked them breaking up altogether. The work had to be undertaken in situ, requiring the use of a scaffolding tower. The arch was no longer
perfectly symmetrical as the bones have slipped and turned slightly over the years, due at least in part to tree roots
penetrating their buried portions and splitting them. On the left side, this meant that the bone had been displaced by about seven inches and the bone
seems to have ‘swivelled’ in slow-motion. There was not enough internal mechanical strength left in the bone to re-orientate it without risking the
whole bone breaking in to pieces. As the asymmetry of the arch is only slight, it was not worth taking this risk.

 As the old supports had deteriorated to the point where they no longer provided any help to keep the bones upright (see left and right), new supports
had to be put in place before the bones could be cleaned or repaired. First, the old rusty gate had to be removed, and the old metal gateposts that had
rusted through and wooden fence posts that had rotted. This included digging down to remove the large concrete masses into which the metal posts had
been set. The adjoining hedge was trimmed back so that the left bone could be accessed, and the earthen bank dug away to prevent further rotting of the
bone. This necessitated removing the stones of an old buried dry wall.
As the old supports had deteriorated to the point where they no longer provided any help to keep the bones upright (see left and right), new supports
had to be put in place before the bones could be cleaned or repaired. First, the old rusty gate had to be removed, and the old metal gateposts that had
rusted through and wooden fence posts that had rotted. This included digging down to remove the large concrete masses into which the metal posts had
been set. The adjoining hedge was trimmed back so that the left bone could be accessed, and the earthen bank dug away to prevent further rotting of the
bone. This necessitated removing the stones of an old buried dry wall.
The positions of the new oak posts were plotted-out and holes dug for them. During this process, many roots from the two nearby yew trees were encountered
and the bases of the bones were inspected. This was when the extreme damage to the left bone was discovered and the lesser damage to the base of the
right bone. All roots encountered were cut through and removed, to reduce the damage done by the roots over the next few years, but they will no doubt
grow again. The new posts were put in place and all held steady by lengths of wood nailed and screwed to them so that tapes and spirit levels could be
used to make sure they were all upright and in line with one another (due to the ‘rustic’ nature of the posts, this took some time). ‘Fencecrete’ was
then mixed and poured into the holes to give the posts a secure base before the soil was replaced and tamped down firmly. The arch was then braced with
lengths of wood and the remains of the old supports were removed so they did not hinder the placing of the new metal brackets.

 The portable forge was set up,
along with the generator that powered the fan required to get the forge to the necessary heat. Lengths of flat steel
were cut to the right size and were then shaped to fix around and between each pair of posts, lying just behind the outermost portion of the arch
about a third of the way up. The metal had to be marked where a bend was needed, then heated until red hot, then bent and/or hammered to the right
shape, then cooled-down in water before offering it up to the posts and bone to see where it next need bending. This process was undertaken many
dozens of times for each piece of metal. It took a while as each post was a slightly different size and shape. Once it was a perfect fit this new
bracket was cleaned with an angle grinder then the bracket and the posts were drilled so that a coach-bolt could be inserted and tightened to hold
it in place. A new piece of steel was measured and cut to curl around the bone on the inside of the arch and it was shaped in the same manner above
until it was a perfect fit around the bone and along the bracket.
It was then cleaned with the angle grinder, the rear side painted with protective Hammerite
metal paint, and then welded to the first part of the bracket. The welded portion was tidied and cleaned with the angle grinder and painted. The brackets
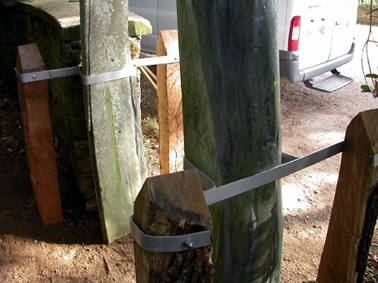
sit at the same height and describe roughly the same shape around the bones (see below). They have been painted with two layers of silver Hammerite
metal paint and should be repainted at least every other year to keep rust at bay. The oak posts will eventually weather to a greyer colour and blend-in
more with the bones, metalwork and stone wall.
The portable forge was set up,
along with the generator that powered the fan required to get the forge to the necessary heat. Lengths of flat steel
were cut to the right size and were then shaped to fix around and between each pair of posts, lying just behind the outermost portion of the arch
about a third of the way up. The metal had to be marked where a bend was needed, then heated until red hot, then bent and/or hammered to the right
shape, then cooled-down in water before offering it up to the posts and bone to see where it next need bending. This process was undertaken many
dozens of times for each piece of metal. It took a while as each post was a slightly different size and shape. Once it was a perfect fit this new
bracket was cleaned with an angle grinder then the bracket and the posts were drilled so that a coach-bolt could be inserted and tightened to hold
it in place. A new piece of steel was measured and cut to curl around the bone on the inside of the arch and it was shaped in the same manner above
until it was a perfect fit around the bone and along the bracket.
It was then cleaned with the angle grinder, the rear side painted with protective Hammerite
metal paint, and then welded to the first part of the bracket. The welded portion was tidied and cleaned with the angle grinder and painted. The brackets
sit at the same height and describe roughly the same shape around the bones (see below). They have been painted with two layers of silver Hammerite
metal paint and should be repainted at least every other year to keep rust at bay. The oak posts will eventually weather to a greyer colour and blend-in
more with the bones, metalwork and stone wall.

Once the supports had been completed, the bones could be cleaned. This was undertaken with a variety of brushes and a vacuum cleaner to remove the
plant detritus, moss, bird droppings, old spiders’ webs etc. Old repairs made with mortar were removed as they were very heavy. The entire bone arch
was then consolidated with a diluted conservation-grade adhesive to give it more strength and afford it some protection against the weather etc in future.
Some pieces of bone that had already fallen to the ground were re-adhered. Pieces that were in the process of curling away from the bone in strips were
pulled towards the bone with tensioning straps after being soaked in consolidant so that they set in the right position.
This consolidation and repair strengthened the whole arch considerably, but the interior portions of the bones were still exposed to the elements
and vulnerable to damage over a number of years. Therefore the decision was taken to protect the bones further by modelling-in the missing external
surfaces with glass fibre and an architectural acrylic resin. This was sanded down and painted to match the rest of the lichen-covered arch. As it
is an architectural product it is extremely durable and should last decades without failing.

For more details about what we can do for you, or for a quote, please
contact:
enquiries@natural-history-conservation.com
We
are members of the United Kingdom Institute for Conservation of Historic and
Artistic Works